
Adapted for the web from a chapter in Brain Tan Buffalo Robes, Skins and Pelts
by Jim Miller

Our ancestors lived very close to the circle of life. Thankful always for the food, tools and clothing that came from a successful hunt. Warmth, color, protection and camouflage are shared with us by our four-legged brothers through the giving of their pelts. Today, one need only walk the roadside to find animals whose lives were taken. Thoughtlessly and sometimes without knowing, left there to become crow food. Whether you are seven or seventy, for the beginning tanner a road kill could become a rewarding first project.

Many of these pelts are in perfect condition. Nonetheless, a pair of rubber gloves are recommended when handling these critters from the wild. My hat is made from the first pelt I ever tanned. It was a large, fluffy road kill raccoon I named Ricky. But whether from the trap or the road, each animal comes with a complete tanning package — no chemicals are needed. The process is an easy one and will start you on the way to using all of the animal when you take it’s life. So let’s get started.
To remove the pelt from the body or carcass, tie both back legs to a tree limb about head high. With knife or sharp stone in hand make an incision from the hock to the vent (see diagram 1). Next cut the tail on the underside from the vent to it’s tip. Using the knife gently, begin pulling the pelt up away from the leg and cut the film or membrane that holds the skin to the meat.
As much as possible pull the pelt off the carcass. Only use your knife if absolutely necessary. If the raccoon is a fairly fresh kill and still warm, the membrane and pelt will pull away easily. However, if the carcass is cold, this stuff acts like rubber cement and must be cut carefully, particularly at the head, neck and tail. Always leave as much of the fat and meat on the carcass as possible. It will sometimes want to pull off with the pelt. Cut through the cartilage beneath the nose and ears. Pelts taken off in this manner are referred to as cased. They’re great for bags and pouches to flip over a belt. Also very warm as socks though usually the fur is short lived.
To simplify your first project, slice the hide open all the way up the belly to the hair of the chinny-chin-chin. (Sorry, it’s an old butchers saying.) Now, throw it over a very smooth log or tack it out flat on a piece of plywood (see photo). Buffaloes I stake out right on the ground. Definitely not a good beginners project! You can use a fairly crescent shaped knife held at a 90 degree angle to the pelt. I also use the same scraper used on buffalo.

Now push and scrape. Remove all the fat, meat and membrane until you begin to see the pores of the skin. Sometimes hair will pull back through the underside of the skin. This is usually from animals killed during the summer or early fall. Just move on to the next area and keep scraping. The membrane on the head or mask is the toughest to get off, so take your time.
Of course if the animal was struck by a car and has Good Year stamped in the facial fur, you may want to cut the mask off entirely. The tails generally have a lot of fat on them. Clean them well (soap and water?) but go gently, they can break fairly easily. Fortunately they’re so fluffy they can be sewn back together without a sign of the disaster.
You’ve finished the first step referred to as fleshing. Pelts and skins used for brain tanning require a thorough fleshing job. The fine oil that is used is the reason for this. No harsh or toxic chemicals are used. This is the only way for me. The way it was created to be used. This leaves you with a pelt that is soft, light, fluffy and very natural feeling.
When the animals life is taken it gives you a complete tanning package as a bonus. Every critter has enough brains to tan it’s own hide, except buffaloes (and some people I know). Remove the brain from the raccoon’s skull and mix with about 1-1/2 cups of water. Cook this mixture for about 10 minutes. Then mash, mix or blend into an oily liquid. This will be divided into two equal amounts.
Buff up the pelts surface with some sandpaper, sandstone, or granite rock. Apply the lukewarm mixture and rub it in by hand. Go ahead ladies, it’ll make your skin soft. Allow to dry overnight. Thicker pelts require more brain and more applications but most raccoons can be done in just two coatings. Buff the surface again and apply the second coat. Now cover with a very warm and wet towel and let it set overnight.
The following morning uncover and begin to stretch your hide (see photo). Pull side to side and head to tail. The back of an old wooden chair works well for this. Pull the pelt down over it, stretching and buffing over the full length of the pelt. Take breaks whenever needed, but continue to stretch until dry.
If for some reason the pelt dries tough in some spots, mix another solution of brains and re-apply, let it soak
in and stretch until dry. If you do enough tanning you will get some tough ones. Take it as a lesson from mother nature and keep trying. The fibers in the skin
are a lot like a baby diaper, crossing and overlapping each other. Applying oil to these fibers and rubbing them together fluffs them up making them soft and airy.
| A Note From the Editor While some pelts do come out soft with the first braining, you should expect your pelt not to do this. If it does consider yourself lucky. If you are softening and you notice that the pelt is getting unacceptably stiff (anywhere besides the edges)and you can’t work that stiffness out…its time to re-apply the brains. If you wait until the hide is totally dry before re-braining, it won’t absorb the brains as well and won’t soften up as soft. You can continue this re-braining, re-softening cycle until the hide is as soft as you want it to be. |
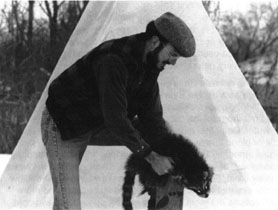
When the pelt is dry and no longer cool to the touch, it’s ready to be smoked in the teepee. The skin can be hung at the top and rotten wood placed on the fire to smolder and smoke. At the campfire the pelt can be suspended on sticks downwind but out of reach from a possible wild flame. Remember you want smoke not fire. Moths like tanned pelts of any kind. but smoking deters them allowing you to enjoy them year round.
So clear out a corner of the garage and brain-tan those pelts. A beautiful and respectful momento from the hunt or a well earned reward for salvaging a road kill.
Hey, honey, stop the car. I think I saw something back there.
A couple additional bits of information for you when working with beaver pelts. Average to large blanket size beaver are very thick at the neck, tail and jaws. I call them baby buffalo. And as with buff’s I use my hand held scraper (wahintke) to thin them out a bit before braining. This will require them to be stretched and tacked on a board after fleshing over the beam, or laced onto a hoop or small rack.
Feel the thickness of the pelt in the rib area and use that as your gauge for the rest of the back, neck and tail. This scrape/thinning is most easily accomplished when the pelt is still damp. It works well in winter to hoop and freeze scrape them too. Temperatures of 20 degrees or less work best.
Also, with many of the heavier pelts such as beaver, I brain them twice and work them dry as described earlier in this chapter. Then I dunk them right into the warm brain slurry. After soaking for an hour or more I stretch and pull it in the solution until it is completely saturated and then wring it out just as a deer skin! The hair will look shiny and does not slip. (I got this tip several years ago while working with another tanner from Montana.) Just be sure to work the pelts completely dry and give them a thorough smoking of a couple hours or more.
| This Article is excerpted from Jim’s forty page book Brain Tan Buffalo Robes, Skins and Pelts. You can read our online review and ordering information to get a copy directly from Jim. You can find contact information and more details about what Jim does in braintan.com’s Resource Directory. |
©1997 by Willow Winds
Drawings by: Joe Schnur
Photos: Greg Lashbrook